
In beginning of our Python Programming Basic class, we use web version python code you run on trinket. You may ask “How can I run Python code on my computer out of the trinket environment?”. Yes, this is a good question. We learn Python to be used in a real environment on our local computer. Next, let me introduce you to the common methods of building a Python environment. In our later part Python Programming Basic class and Python Crawler Advance class, we use Pycharm as our local python IDE.
PyCharm is a cross-platform editor developed by JetBrains. Pycharm provides all the tools you need for productive Python development. Among many editors, Pycharm is relatively friendly to new users. On the one hand, it will automatically complete the code. For example, if you write the front quotes, it will automatically fill in the back quotes; on the other hand ( More importantly) It will prompt you when the code is written. Therefore, the first article we recommend in the editor recommends Pycharm.
This article is divided into three parts, namely Installing Python, Third-party library installation and Installing Pycharm and use
Below are the detailed steps for installing Python and PyCharm
Installing Python
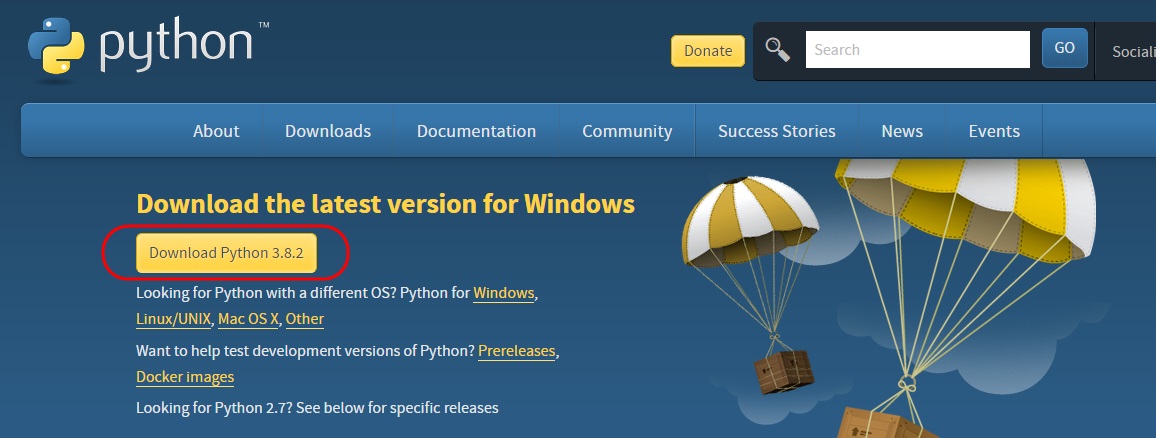
Step 1) To download and install Python visit the official website of Python https://www.python.org/downloads/ and choose your version. We have chosen currently latest Python version. Click the Download button to enter the download page, there are a variety of versions at the bottom to choose from.
We choose the appropriate version according to our system type (32-bit or 64-bit) and click to download, generally we choose executable installer. The differences between the various versions are:
embeddable zip file: embedded version, can be integrated into other applications
web-based installer: network installation
executable installer: executable file (* .exe) installation
We selected Windows x86-64 e installer here, double-click to open after the download is complete, you can see the interface as shown below:
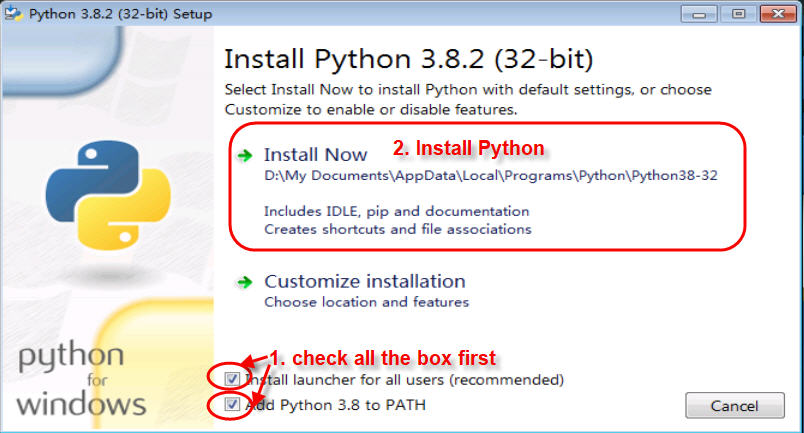
Step 2) Once the download is complete, run the exe for install Python.
Note: first check all the boxes. The Add Python 3.8 to PATH circled in the figure must be checked, otherwise ‘python’ will give error after installation. then click Install Now
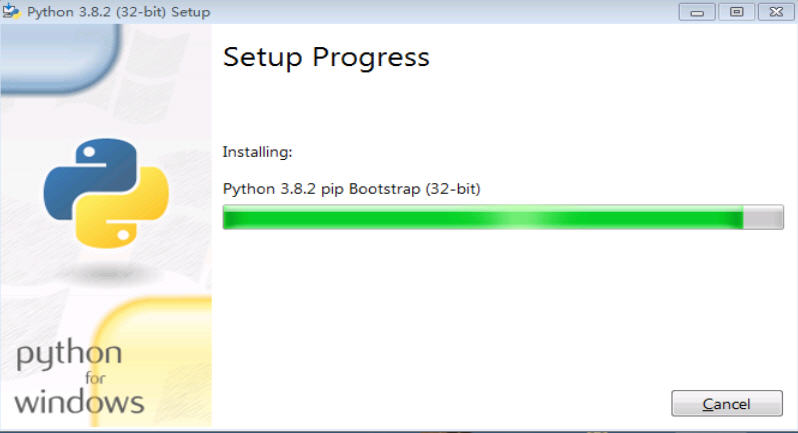
Step 3) You can see Python installing at this point.
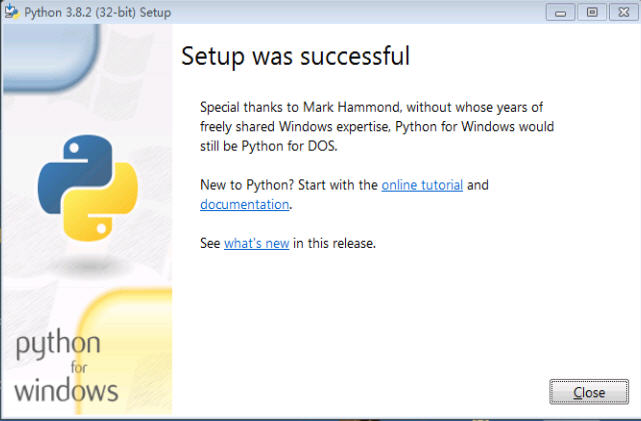
Step 4) When it finishes, you can see a screen that says the Setup was successful. Now click on “Close”.
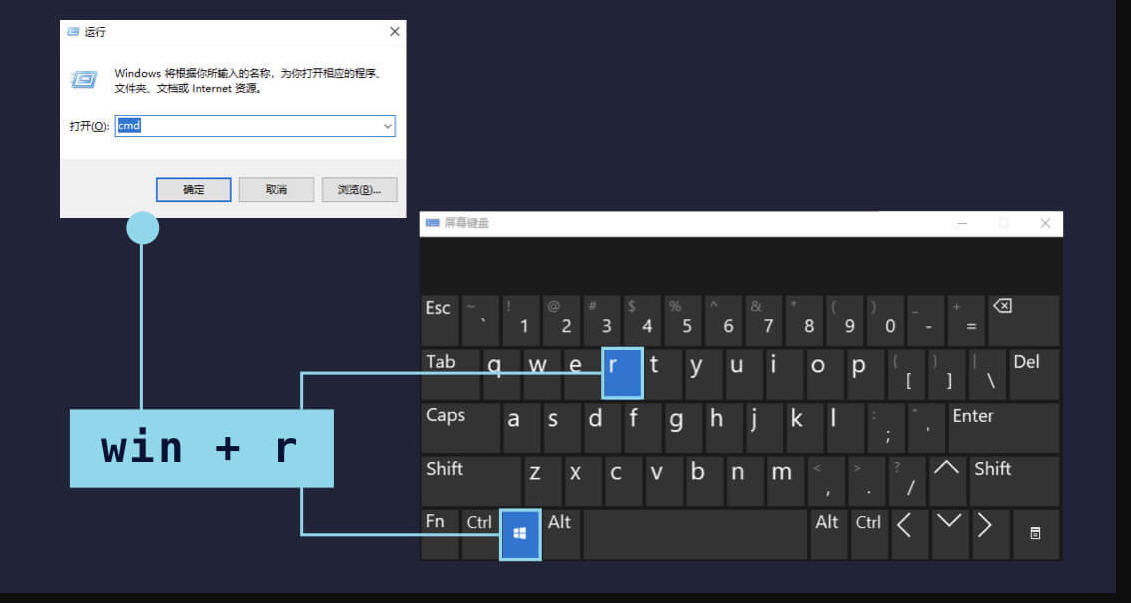
Step 5) After closing the installation interface, we use the win + r shortcut key to open the run window, enter cmd in the run window, and click the OK button to open the command prompt, which is the command line.
Step 6) Enter python in the command prompt window and press Enter. When you see the version information of Python, you have entered the Python interactive environment. Then we can enter the python code after >>> to execute.

Install on Mac
Mac generally comes with Python, but the version is older. Next, let ’s talk about how to install the latest one. Choose one of the following two methods:
Go to the official website to download and install like Windows;
Install through Homebrew. If Homebrew is already installed, simply execute in the terminal:
brew install python3
Manually run python program in command line is hard. The more recommended way is to use an editor or IDE to create a py file to write and run code. A good coding tool can greatly improve coding efficiency. Here, we recommend using vscode or pycharm.
Third-party library installation
The reason why Python is so powerful is inseparable from its rich third-party libraries. Next we look at how to install third-party libraries.
Python uses pip to manage third-party libraries. Python 2.7.9 or Python 3.4 and above all come with pip tools, which we can use directly.
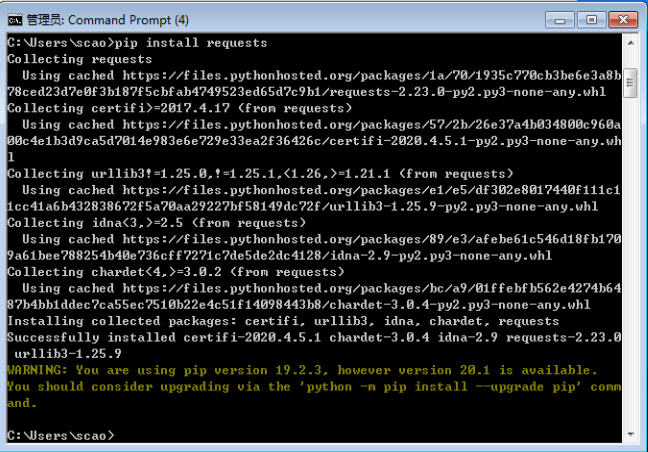
First, we open the command prompt window by the method mentioned above, then enter the name of the third-party library pip install and press Enter to start the installation. For example, we want to install the requests library, just type
pip install requests
and then press Enter key to install
It should be noted that the command is entered directly in the command prompt window(or in Terminal window in pycharm). Many students open the command prompt, enter python, and then install the command. This is wrong.
Installing Pycharm and Use
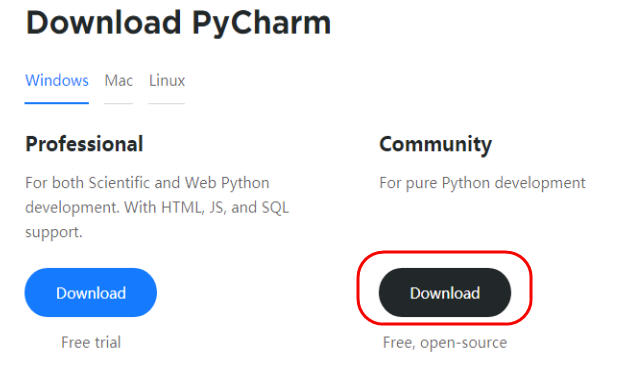
Step 1) To download PyCharm visit the website https://www.jetbrains.com/pycharm/download/ and Click the “DOWNLOAD” link under the Community Section, which is free.
Step 2) Once the download is complete, run the exe for install PyCharm. The setup wizard should have started. Click “Next”.

Step 3) On the next screen, Change the installation path if required. Click “Next”.

Step 4) On the next screen, Check all boxes first, which create a desktop shortcut, associate .py and add PATH. Then click on “Next”.

Step 5) Choose the start menu folder. Keep selected JetBrains and click on “Install”.

Step 6) Wait for the installation to finish.

Step 7) Once installation finished, you should receive a message screen that PyCharm is installed. (After the installation, the computer will be required to restart, select the one above to automatically restart, select the next one to manually restart. choose either one is ok). click “Finish”.

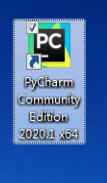
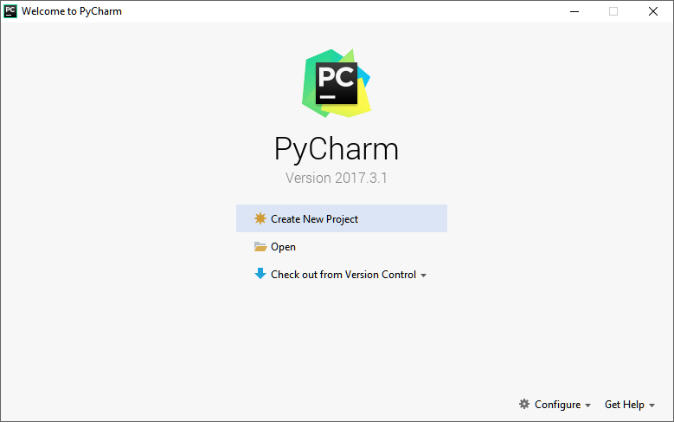
Step 8) Find your new installed PyCharm program on desktop . double click to Open it.
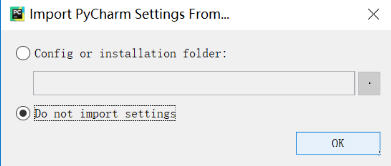
Step 9) After you open Pycharm, you will be asked if you want to enter the previous settings. For the first installation, select “Do not import”

Step 10) Privacy policy, please check if you have no patience, then continue
Step 11) Click Create New Project, or Open your folder. We suggest create a folder on desktop name python, then open the folder python on desktop. In our class, we need to create at least 3 folders under python: python1, python2, python3 for your diffrent levels of python class.
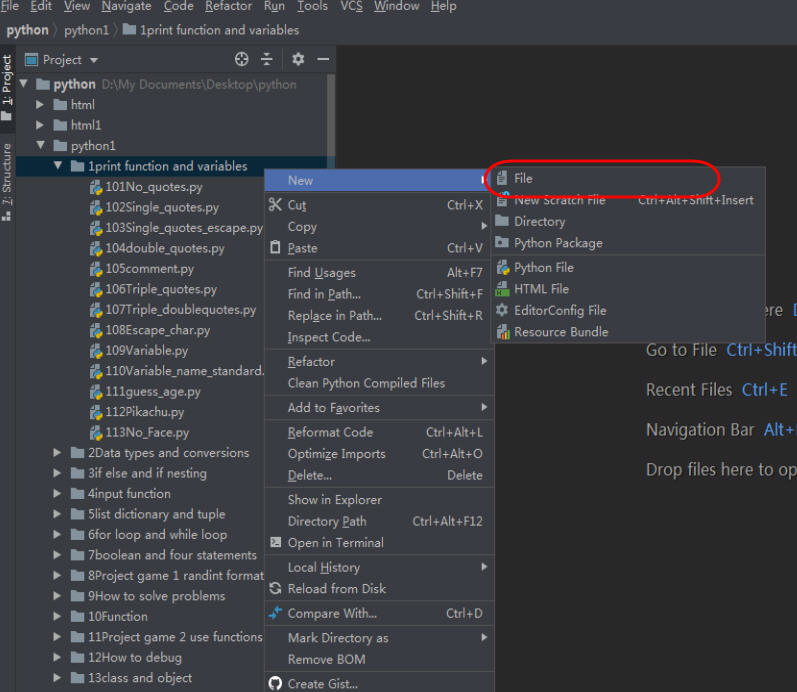
Step 12) If you haven’t create folders in pycharm before, it is easy, Just right click on python folder in left side, select New, then select Directory .
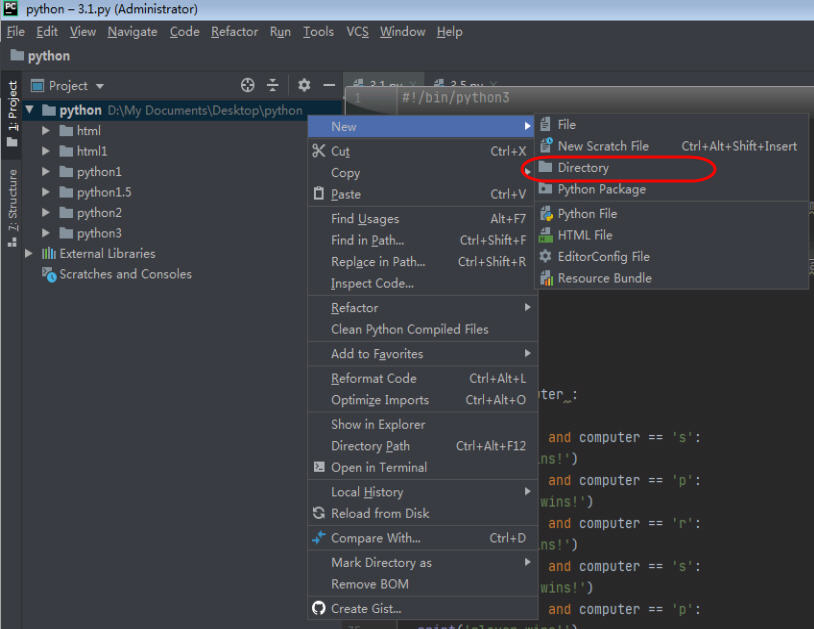
Step 13) type in name of directory , for example, python1, press Enter . Create python1 folder

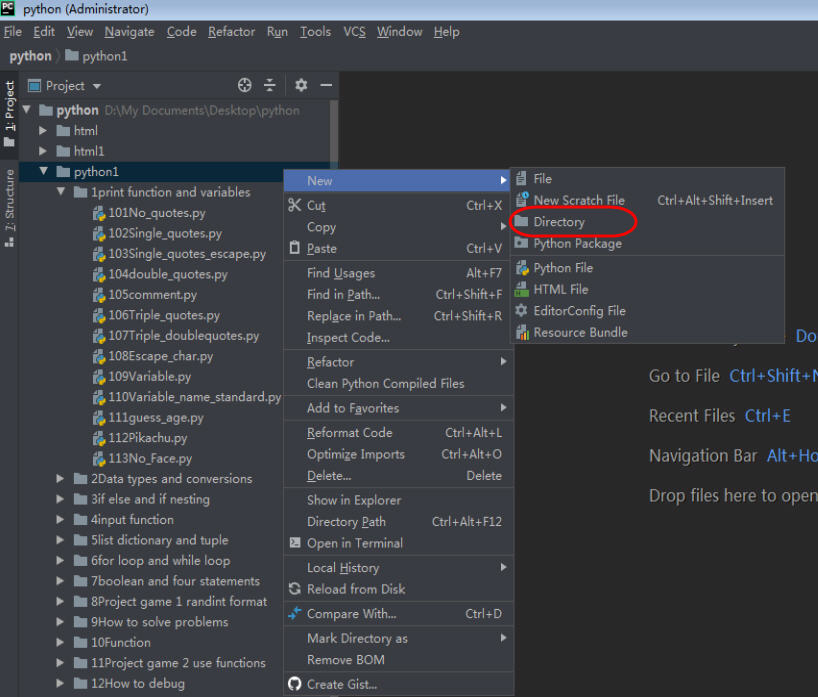
Step 14) Right click on python1 folder in left side, select New, then select Directory . type in name of 1st class in Python Programming Basic class, 1print function and variables (You can go to 1st Basic class and copy the class name from lemonthy.ca), press Enter
Step 15) Right click on 1print function and variables folder in left side, select New, then select file. type in name of 1st execs in Python Programming Basic class, 101No_quotes.py (You can go to 1st Basic class and copy the exec name from lemonthy.ca), press Enter
Step 16) double click on new file 101No_quotes.py. type your code in 1st class. There are 3 ways to run the code: 1. right click on empty space of code on screen , then select Run 101No_quotes.py . 2. or you can click green triangle run button on top right side of toolbar. 3. you can press shortcut key Ctrl+Shift+F10

The last is our intergrated Anaconda. Anaconda is a large collection that includes Python and its commonly used tools and modules. For beginners, just installing Anaconda is enough! Please google how to install Anaconda . and follow the instruction to install
python and pycharm
lemonthy.com test1
testpostsession1
psotgood2
postgood3
post52class1
wow ok
this is the second worst thing to-
yellow
did that work?
wait wait wait so you’re telling me that NOW it decides to work
ok so everything shows up on the admin logs
ok wAIT CHECK THE ADMIN LOGS I SWEAR I’M NOT HALLUCINATING
ok then
wait so i think it works also stop watching me
new code is so troublesome to sort through
908
909
everything is literally lagging out stop watching me
hands are getting cold again – 908 blog
listening to stuff idk – 909blog_class
\908
at least
9 0 9